Sweet as a Peach Thank You cards


Welcome back to the most awesome blog hop!!  Here is my March customer appreciation card.  Place a Stampin' Up!® order with me using the current host code and get this card from me!!

March Customer Appreciation Card


Speaking of "Sweet as a Peach," did you hear I became a "Memaw"?  Look at this little "peach"! That is why I was a little late in adding my blog to the hop.  


I could hold her forever.... but we need to make a card!!


Here are some easy-to-follow directions to make your own.

Items needed:

Sweet as a Peach stampset
Layering Circle dies
Hive 3D embossing folder
Heart and Home DSP
Cardstock: Night of Navy, Cajun Craze, Basic White
Inks: Memento Black, Pale Papaya, Old Olive


  • Cut Night of Navy to 8½" x 5½", score at 4¼" for cardbase.
  • Cut Night of Navy to 4" x 5¼" then run thought the embossing machine with the Hive 3D folder.
  • Adhere the embossed panel to the cardbase.
  • Cut 3 DSP pieces to 2" x 3", then adhere to the cardfront. 
  • Using the Layering Circle dies, cut a small circle (2⅛") from Basic White.
  •  On the white circle, stamp the peach in Pale Papaya, the stem/leaf in Old Olive. Stamp the sentiment in Memento Black.
  • Cut the scalloped circle (2½") from the Cajun Craze cardstock.
  • Adhere the stamped Basic White circle to the Cajun Craze circle, then adhere it to the cardfront using dimensionals.
  •  Apply the bee with a glue dot.

Please hop along to the next blog! Go on!!!  I got a baby to hold!!!!


·      


Celebrate Sunflowers Shadow Box


With so much heartache going on in the world, sometimes we need a reminder to look towards the light.  This quote from Helen Keller is so fitting and the Celebrate Sunflowers stamps are the perfect companion. AND, the Celebrate Sunflower stampset and dies are bundled for the Savings in Bloom sale - just $45.50!

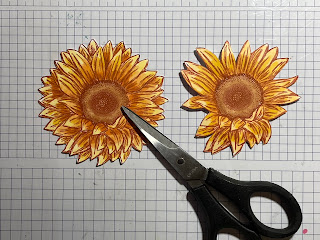
I wanted to show you how I layered the sunflower for that 3D effect!

  • Stamp two sunflowers in Cajun Craze on Basic White cardstock. 
  • Color them with Stampin' Blends as you choose.
  • Die cut both sunflowers.


  • Take one sunflower and cut away the "back" petals.

  • Adhere the full sunflower to your background using dimensionals.
  • Take the cut sunflower and bend the petals backwards.
  • Add glue to the middle and stack dimensionals on the petals as shown.

  • Adhere to the top of the full sunflower.  Voila!!! (Don't tell your friends how easy it was.... let them think you are an artist!!)


Right now you can get 20% off the Celebrate Sunflowers bundle and many others.  Get your mini embossing machine for 20% off also!
Click the link on the rights side of the screen to see all the Savings in Bloom specials!

Artistically Inked - March Team Member Card


My team members will receive this card as a token of my appreciation.


This card is also part of Kylie's Blog Highlights Gallery.  I am honored to participate in this contest with such talented artists. Clicking the button will allow you to view the other cards in this contest. You can vote for a total of 5 cards- I hope you will pick my card for one of those votes. 


I can't believe that it took me so long to start playing with the Artistically Inked suite - the stampset, the dies and the DSP are beautiful!

I love the simplicity, versatility and beauty of this cardfront. And because the leaves are only adhered with two glue dots, they jump off the paper! My team members will love this!

~The double-sided paper allows you to choose flowers or greenery.  
~This can be used for any occasion and sentiment.

Items Needed:

Paper: Evening Evergreen, Basic White, Gold Metallic Paper, Expressions in Ink DSP

Embossing Folder and Dies: Tasteful Textile folder and Artistic dies

Embellishments: Brushed Metallic Dots or Brushed Brass Butterflies

  • Cut Evening Evergreen paper to 8½" x 5½", score at 4¼" to create cardbase.
  • Cut Basic White to 5¼" x 4" and emboss using the Tasteful Textile folder.

  • Adhere the embossed Basic White piece to the cardbase.
  • Cut 4 pieces of the DSP to ¾" x 3".  Adhere to the Basic White in a staggered style using dimensionals.  
    • Helpful hint:  Start with the top right and the lower left first so that you can space them evenly.

  • Use the long leaves die to cut the leaves from the gold paper. 
    • Helpful hint:  Run it through the embossing machine a few times, then use the brush end on your "Take you Pick" tool to remove the tiny pieces.


  • Add two glue dots to the back of the leaves where shown with the black dots. Adhere to the DSP.


  • Add your embellishments -dots or butterflies! 


Thanks for checking out my card.  Interested in joining my team?  Just click here to find out how.